paste it into your Blogger Template ju

Friday, 14 October 2011

Remove and Replace in C#.Net

The Remove Method

As its name suggests, this method is used to Remove characters from a string of text. Here's a simple example of its use:
string oldString = "some text text text";
MessageBox.Show(oldString);
string newString = oldString.Remove(10, 9);
MessageBox.Show(newString);
Remove takes two parameters. The first one is what position in your string you want to start at. (The count starts at zero.) The second parameter is how many characters you want to delete, starting from the position you specified. Add another button to your form and try out the code above.

The Replace Method

The Replace method, you won't be surprised to hear, can be used to replace characters in your string. Here's an example of its use:
string spellingError = "mistak";
spellingError = spellingError.Replace(spellingError, "mistake");
The Replace method takes two parameters, the old word and the new word. In the code above, we're replacing "mistak" with "mistake".

PadLeft and PadRight

The PadLeft and PadRight methods in C# can also be used to insert characters. But these are used to add characters to the beginning and end of your text. As an example, add a new button to your form, and a new text box. For the text box, set the Text property to "Pad Left". Double click your button and enter the following code:
string paddingLeft = textBox5.Text;
paddingLeft = paddingLeft.PadLeft(20);
textBox5.Text = paddingLeft;
The PadLeft and PadRight methods can take 1 or two parameters. We're just using 1. This will insert blank space characters to the start of the string. The total number of characters will be 20. So, if you have four characters in the text box, PadLeft(20) will add 16 blank spaces, making a total of 20 characters in the text box after the button is clicked.
Run your programme and test it out. Type the text "Pad Left" in the text box. Your text box should look like this before the button is clicked:

A Text Box before Pad Left
And it will look like this after you click the button:
A Text Box after Pad Left
If you don't want to pad with blank spaces, you can use the second parameter. This is the character you want to pad with:
paddingLeft = paddingLeft.PadLeft(20 , '*');
In the code above, we're telling C# to pad with the asterisk character, instead of the default blank spaces. (Note the use of the single quotes surrounding the * character. C# doesn't seem to like you using double quotes, if the type is char.)
If you change your code to the one above, then click the button on your form, the result will be this:

Padding with the asterisk character
If you want to add characters to the end of the string, use PadRight instead of PadLeft.

The Insert Method in C#.Net

The Insert method is, not surprisingly, used to insert characters into a string of text. You use it like this:
string someText = "Some Text";
someText = someText.Insert( 5, "More " );
In between the round brackets of Insert, you need two things: A position in your text, and the text you want to insert. A comma separates the two. In our code above, the position that we want to insert the new text is where the T of "Text" currently is. This is the fifth character in the string (the count starts at zero). The text that we want to Insert is the word "More".

Exercise
Test out the code above, for the Insert( ) method. Have one message box to display the old text, and a second message box to display the new text.

The Contains Method in C#.Net

The contains method can be used if you want to check if a string contains certain characters. It's fairly simple to use. Here's an example:
The Contains method in action

After the contains method, you type a pair of round brackets. In between the round brackets, you type the text you're checking for. In our code, we're using an if statement. If it's true that the string contains a "-" character, then some code can be executed.

Trim Unwanted Characters in C#.Net

If you have another look at the Method list, you'll see that there are three that deal with Trimming: Trim, TrimEnd and TrimStart. These methods can be used to Trim unwanted characters from strings.
Add another button to your form. You can change the Text property of your buttons. Enter the text "Uppercase" for the first one. For the new button, enter Trim for the text property. Add another text box below the first one and set the Text property as follows:
"   Trimming   "
Leave out the double quotes but tap the spacebar on your keyboard three times before you type the text. At the end of the text, tap the spacebar three more times. Your Form should then look like this:

A new text box on the form
The line in the second text box is where the cursor is.
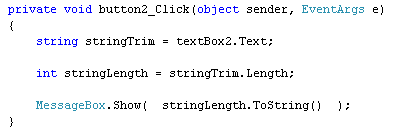
Now double click your second button to get at the code. We can count the number of characters a string has with the Length property. Enter the following code for your button:
Enter this C# code
The first line just gets the text from the text box and puts it into a variable called stringTrim. Have a look at the second line, though:
int stringLength = stringTrim.Length;
We've set up a new integer variable called stringLength. To get the length of a string, type a dot after your string variable name. From the IntelliSense list, select the Length property. Note that you don't need any round brackets, because it's a property not a method. The Length of a string, by the way, refers to how many characters is in the string.
The third line uses a MessageBox to display the result:
MessageBox.Show( stringLength.ToString() );
You've seen the ToString method before. This can be used to convert numbers to a string a text. So "10" instead of 10. (The double quotes mean it's text. Without the quotes, it's a number. The variable called stringLength will hold a number.)
Run your programme and click the Trim button on your form. The message box should display an answer of 14. The word "Trimming", however, only has 8 characters in it. The other 6 are the three spaces we put at the beginning and end of the word.
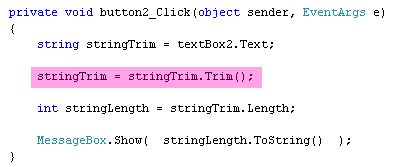
To get rid of space at the beginning and end of text, you can use the Trim method. Add the following line of code to your button:
Add the highlighted line
The code to add is highlighted, in the image above. It's this:
stringTrim = stringTrim.Trim();
So after the dot of the stringTrim variable, you select the Trim method from the IntelliSense list, followed by a pair of empty round brackets. Run your programme and click the button again. You should find that the length is now 8. So Trim has trimmed the blank spaces from the beginning and the end of our word.
If you only wanted to trim the blank spaces at the end of the word, or just the blank spaces at the beginning of the word, you can use TrimEnd and TrimStart:
stringTrim = stringTrim.TrimStart( null );
TrimStart and TrimEnd are supposed to take a character array as a parameter. If you type the keyword null instead, it will trim the white space (blank characters).
Just as a reference for you, here's some code that strips unwanted hyphens off the end of a string:
Trim unwanted hyphens
The trimChar line is a character array ( char[ ] ) with the hyphen in between curly brackets. This is then handed to the TrimEnd method as a parameter.

String Manipulation in C#.Net

Quite often, strings of text need manipulating. Data from a textbox need to be tested and checked for things like blank strings, capital letters, extra spaces, incorrect formats, and a whole lots more besides. Data from text files often needs to be chopped and parsed before doing something with it, and the information your get from and put into databases routinely needs to be examined and worked on. All of this comes under the general heading of String Manipulation.
Later in this section, you're going to be creating your very own Hangman programme. The programme will make use of string manipulation techniques. Let's go through a few of the things that will help you deal with strings of text.

C# String Variables

You've already worked with string variables a lot in this book. But there's a lot more to them than meets the eye. Strings come with their own Methods and Properties that you can make use of. To see which Methods and Properties are available, start a new C# Windows Application. Add a button and a textbox to your form. For the textbox, change the Text property to "some text" (make sure the text is in lowercase). Now Double click your button to get at the coding window. Then enter the following string declaration
string stringVar = textBox1.Text;
On a new line, type the following:
textBox1.Text = stringVar.
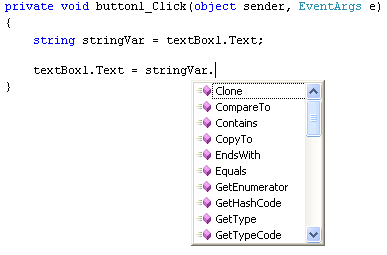
As soon as you type the full stop at the end, you'll see the IntelliSense list appear:
IntelliSense list for C# strings
IntelliSense is showing you a list of Methods and Properties that are available for this string object you have called stringVar. Here's a fuller list:
List of String methods in C# .NET
There's actually one Property on the list. But it's one you use a lot, and we'll see it in action later.
Most of the Methods on the list you won't use at all, and a lot of them are just plain baffling! Some are quite obvious in what they do, though.
Select ToUpper from the list by double clicking it. Because it's a Method, you need some round brackets. Type a left round bracket and you'll see a yellow box appear, giving you the available options for this Method. For the ToUpper Method, there are only two options available:
The ToUpper Method in C# .NET
You can press the Down arrow on your keyboard to see the other one. But the first one, 1 of 2, is the one we need. As the tool tip is telling you, this Method converts the string to upper case. (The current culture it is talking about is which language you're typing in: a symbolic language like Chinese or Japanese will have different grammatical rules than English.)
The round brackets of the Method are empty, meaning it doesn't take any arguments. So just type the right round bracket, followed by a semicolon to end the line. Your code should look like this:
Your C# Code
Now run your programme. When the form starts it will look like this:
The text is in lowercase
After you click the button, C# runs the ToUpper Method and converts the text in the text box to uppercase:
The text has been converted to uppercase
Another Method that changes case is the ToLower Method. This is the opposite of ToUpper, and is used in the same way.

C# Collections - Hash Tables

You use an Hashtable when you want to store information based on Key/Value pairs. For example, the name of a student AND the score in an exam. This allows you to mix text and numbers. (In other programmes, Hashtables are known as associative arrays.)
Add a new button to your form, and double click it to get at the code. We'll add code for an Hashtable.
You start by setting up the Hashtable:
Hashtable students = new Hashtable();
This creates a new object called students. It's going to be an Hashtable object.
There are two ways you can add data to your Hashtable. Like this:
students["Jenny"] = 87;
students["Peter"] = "No Score";
students["Mary Jane"] = 64;
students["Azhar"] = 79;
Or like this:
students.Add("Jenny", 87);
students.Add("Peter", "No Score";);
students.Add("Mary Jane", 64);
students.Add("Azhar", 79);
The first method uses a pair of square brackets:
students["Jenny"] = 87;
In between the square brackets, you type what's known as the Key. So this particular entry in the Hashtable is called "Jenny". After an equals sign, you then type the Value that this Key will hold. Notice that three of the entries are number values, and one (Peter) is text.
The second way to store values in an Hashtable is to use the Add Method:
students.Add("Jenny", 87);
In between the round brackets of Add( ), you first type the Key name. After a comma, you type the Value for that Key.
There is a difference between the two. If you use the Add method, you can't have duplicate Key names. But you can if you use the square brackets. So this will get you an error:
students.Add("Jenny", 87);
students.Add("Jenny", 35);
But this won't:
students["Jenny"] = 87;
students["Jenny"] = 35;
To try Hashtables out for yourself, add the following code to your button:
Hashtable students = new Hashtable();
students["Jenny"] = 87;
students["Peter"] = "No Score";
students["Mary Jane"] = 64;
students["Azhar"] = 79;
foreach (DictionaryEntry child in students)
{
listBox1.Items.Add("student: " + child.Key + " , Score: " + child.Value);
}
Before running the code, have a look at the foreach loop. Inside of the round brackets, we have this:
DictionaryEntry child
This sets up a variable called child. But note the type of variable it is: a DictionaryEntry. C# uses an object of this type when using the foreach loop with Hashtables. That's because it automatically returns both the Key and the Value.
Notice, too, what we have between the round brackets of the listbox's Add method:
"student: " + child.Key + " , Score: " + child.Value
The red bold are the important parts. After typing the name of your variable (child, for us) and a full stop, the IntelliSense list will appear. Key is a property that returns the name of your Key, and Value is a property that returns whatever you placed inside of that Key.
Run your programme and click your button. The form on your listbox will then look like this:
HashTables
Notice that the list of items has been sorted automatically. But the sort is done on the Keys, not on the Values.
But just like the ArrayList, you can Add new items, and remove old ones. To Remove an item, you do it like this:
students.Remove("Peter");
So you refer to the Key name, and not the Value, when you use the Remove method.

C# Collections - Array List

Arrays are very useful for holding lots of values under the same name. But there is also something called a Collection that does a similar job. In fact, there's an inbuilt group of Classes in C# specifically for Collections. They can be quite powerful.
With an array, you store data of the same type. So one array can only hold, say, numbers, but not letter. And an array set up as string can't hold numbers. So you can't do this, for example:
arrayPos[0] = 1;
arrayPos[1] = "two";

The first position holds a number and the second position holds text. C# won't let you do this in an array. But you can do it in a collection known as a Hashtable.
Collections can also make it easier to do things like sorting the data in your lists, deleting items, and adding more items. We'll start with the collection class called ArrayLists.

ArrayLists

You use an ArrayList when your collection may need items adding to it, deleting from it, or needs sorting. For example, suppose you are teacher with a class of ten children. You could keep a list of the children's names, add new students, delete ones who leave, and even sort them into brightest and dimmest! If you used a normal array, it would be difficult to do these things.
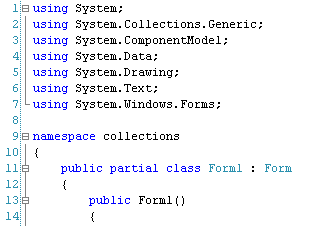
So start a new C# project. Add a button and a listbox to your new form. Double click the button to get at the coding window. Now have a look near the top and you'll see a list of using statements (lines 1 to 7 in the image below):
A List of Using Statements in C#
You need to add a new one, here, for the Collections class (line 8 below):
Add a new reference
When you've added the new using statement, you can use the ArrayList.
To set up an ArrayList, double click the button on your form to create a code stub. Now add the following line:
ArrayList students = new ArrayList();
Your code window will look something like this:

Setting up an ArrayList in C# .NET
So you start with the word ArrayList, followed by a space. You then need to come up with a name for your ArrayList. This is just like any variable name, so you can call it almost anything you like. After an equals sign, you type the keyword new, followed by a space. After the space, you type ArrayList(). Notice the round brackets, here.
After setting up the ArrayList, you need to fill it with data. For ArrayLists, it's better (but not required) to keep to the same data - all text, or all numbers, but not a mix of both. Add the following three lines to your code:
students.Add("Jenny");
students.Add("Peter");
students.Add("Mary Jane");
Your coding window will then look like this:
Adding items to the ArrayList
After typing the name of your ArrayList (students, for us), you may have seen the C# IntelliSense list appear:
IntelliSense list
This is a list of all the Methods and Properties that an ArrayList has. The one that you use to add items to your ArrayList is called, not surprisingly, Add( ). Between the round brackets of Add( ), you type the data that you want to add to your ArrayList:
students.Add("Jenny");
For every item in your collection, you need a new line that Adds items.
To access the items in your ArrayList, you can use a foreach loop. Add this to your button code:
foreach (string child in students)
{
listBox1.Items.Add( child );
}

So we're looping round all the items in the ArrayList, and then adding them to the listbox.
You can also use an ordinary for loop:
for (int i = 0; i < students.Count; i++)
{
listBox1.Items.Add( students[i] );
}

Notice that the end condition is students.Count. Count is a property of ArrayLists that tells you how many items is in it. Inside the for loop, we're using square brackets with the index number inside. This is just like the normal arrays you used earlier.
You can add a new item to your ArrayList at any time. Here's an example to try:
Add a new ArrayList item
So we're adding a fourth student to the ArrayList, Azhar, and then displaying the item in the listbox.
Add the new code to your button. Run your programme and click your button. Your form will look something like this:
ArrayList Form
Sorting an ArrayList alphabetically is quite straightforward. You just use the Sort Method. Like this:
students.Sort();
And here's some code to try out. The new lines are highlighted:
C# .NET Code to Sort an ArrayList
Run your programme and try it out. Here's what your listbox will look like after the button is clicked:
A sorted ArrayList
As you can see, the items have been sorted alphabetically.

Removing items from an ArrayList

To remove an item from your list, you can either use the Remove or the RemoveRange methods. The Remove method deletes single items from the ArrayList. You use it like this:
students.Remove("Peter");
In between the round brackets of Remove, you simply type the item you want to remove.
If you want to remove more than one item, use RemoveRange. Like this:
students.RemoveRange(0, 2);
The first number between the round brackets of RemoveRange is where in your list you want to start. The second number is how many items you want to remove. Here's some code to try at the end of your button:
students.RemoveRange(0, 2);
listBox1.Items.Add("=================");
foreach (string child in students)
{
listBox1.Items.Add(child);
}

But that's enough of ArrayLists. There's lots more that you can do with them, and they are worth researching further.

Arrays and Text in C#.Net

You've seen how to place numbers into an array. But you can also place strings of text. In the next section, we're going to be studying the subject of Strings more closely. We're going to develop a hangman game that makes use of arrays and text. So a reasonable understanding of how to place text into an array will make the going easier!
Add a new button to your form, and set the Text property to String Arrays. Then double click your button to get at the code.
To place text into an array, you set up your array as you normally would, except you use the keyword string instead of int. Like this:
string[ ] arrayStrings;
arrayStrings = new string[5];

So the above code would set up an array that is going to hold strings of text. There will be five positions in the array.
Add the code above to your button.
To place values in the array, it's just normal variable assignment, with a pair of square brackets after the variable name:
arrayStrings[0] = "This";
arrayStrings[1] = "is";
arrayStrings[2] = "a";
arrayStrings[3] = "string";
arrayStrings[4] = "array";
Add the above to your code, and then we'll discuss ForEach Loops.

The ForEach Loop

To access the values in each position of your array, you could use a for loop, as you have been doing. Like this:
for (int i = 0; i != (arrayStrings.Length); i++)
{
listBox1.Items.Add( arrayStrings[i] );
}

But there's another type of loop that you haven't met yet called a foreach loop. This comes in handy when you're trying to access items in a collection, which you'll see how to do shortly. But add this to your code, instead of a for loop:
foreach (string arrayElement in arrayStrings)
{
listBox1.Items.Add( arrayElement );
}

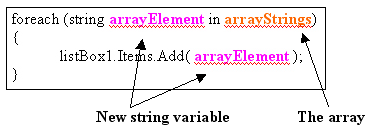
Notice where all the keywords are in the loop code above, the ones in blue. You start with the foreach keyword, followed by a pair of round brackets. In between the round brackets, we have this:
string arrayElement in arrayStrings
This is really two parts in one. In the first part, string arrayElement, you set up a new variable. The new variable will hold the elements (array values) from each position in your array. The second part, in arrayStrings, is where you tell C# the name of the array or collection you want to access. C# will then loop round all the positions in your array, and place the value at that position into your new variable (arrayElement, for us). You can then do something with the value in the new variable. All we are doing in our loop is to display the value in a list box. Here's a colour-coded image that may help you to understand what's going on:
A ForEach loop in C# .NET
Notice that for the array, you don't need the square brackets anymore. The neat thing about foreach loops is that you don't need to use index numbers, like you do with ordinary for loops.
Run your programme and click the button. The list box on your form should then look like ours:
What your form should look like

Multi Dimentional Arrays in C#

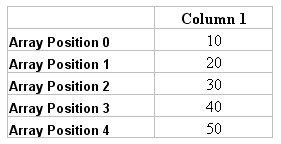
Your arrays don't have to be single lists of items, as though they a were a column in a spreadsheet: you can have arrays with lots of columns and rows. These are called Multi-Dimensional arrays. For a 1-dimensional array, the ones you've been using, it would look like this:
A Single Dimension Array
For a 2-dimensional array, it would look like this:
A Multi Dimension Array
So if you wanted to get at the value of 2000 in the table above, this would be at array position 1 in column 2 (1, 2). Likewise, the value 400 is at position 3, 1.
To set up a 2-dimensional array, you use a comma:
int[ , ] arrayTimes;
You then need a number either side of the comma:
arrayTimes = new int[ 5, 3 ];
The first digit is the number of Positions in the array; the second digit is the number of Columns in the array.
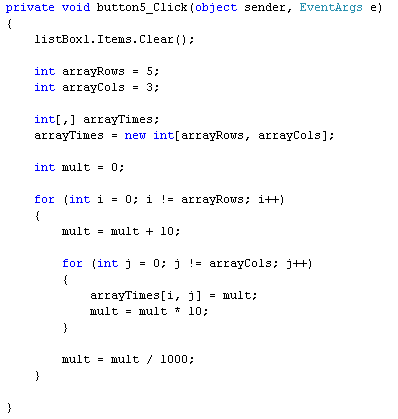
Filling up a 2-dimensional array can be quite tricky because you have to use loops inside of loops! Here's a programme that fills a 2-dimensional array with the values in the table above:
C# .NET Code to fill a Multi Dimensional Array
Notice the two for loops in the code above, one inside of the other. The first loop is setting the value of the Rows (array Positions), and the second loop is setting the value of the Columns.
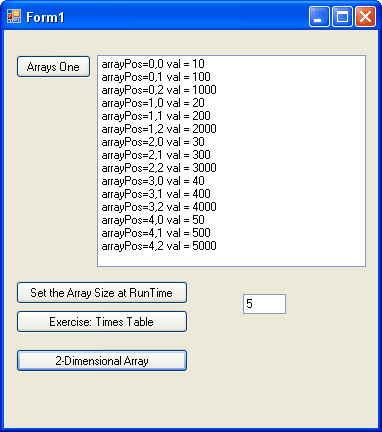
You don't have to understand the code, at this stage of your career! But see if you can puzzle it all out. For the adventurous, add another button to your form. Enter the code above. Now add a second double for loop, and print out the array values in your list box. See if you can get the same values as ours, in the form below:
C# .NET Form - Multi Dimension Array
This is a tough exercise, so give yourself a giant pat on the back, if you get there!

Set the Size of C# Array During Runtime

The size of an array refers to how many items it holds. You've seen that to set the size of an array, you do this:
int[ ] someNumbers;
someNumbers = new int[10];
Or this:
int[ ] someNumbers = new int[10];
But sometimes, you just don't know how big the array needs to be. Think of a programme that pulls information from a database. You want to loop round and check how many of your customers still owe you money. You've decided to hold all the data in an array. But how big does the array need to be? You can't set a fixed size before the programme runs, simply because the number of people owing you money could change. It could be low one month, and high the next.
To solve the problem, you can set the array size at runtime. This would mean, for example, setting the array size after a button is clicked. To see how it works, add another button to your form, along with a text box. Your form should then look something like this:
We've typed the number 5 in the text box, but you can have any number you like.
Double click your button and enter the following code:
int aNumber = int.Parse(textBox1.Text);
int[ ] arraySize;
arraySize = new int[aNumber];
The first line of the code gets the value from the text box and places into a variable we've called aNumber. The second line sets up an array as normal. But look at the third line:
arraySize = new int[ aNumber ];
Now, the figure between the square brackets of int is not a number we've just typed. It's a variable name. Since the value of the variable is coming from the text box, the size of the array will be whatever number is typed in the text box.
Add the following loop to your code, which just assigns values to the array, and places them in the list box on your form:
for (int i = 0; i != (arraySize.Length); i++)
{
arraySize[i] = i + 1;

listBox1.Items.Add(arraySize[i]);
}

Run your programme and click your button. You should see this in your list box:
Now delete the 5 and type a different number. You should see the number from 1 to whatever number you've just typed.
This technique can be used whenever your programme needs to get its array size at runtime - assign to a variable, and use this variable between the square brackets of your array.

Exercise: Use an array in times table programme

To get some more practice with arrays, add another button to your form. Set the text to be this:
Exercise: Times Table
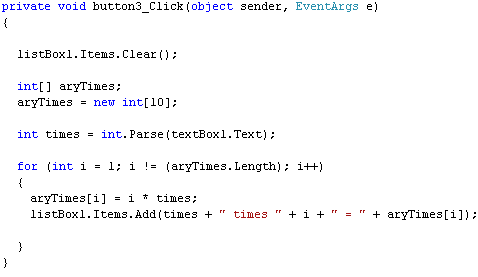
Now double click the button and add the following code:
Add this code to your button
When you run your programme and click the button, your form should look something like ours:
What your form should look like
Notice that the 5 times table is displayed in the list box. Now try the following exercises:
Exercise
The first item in the array, arrayTimes[0], doesn't get used - why is this?

Exercise
Amend the code so that the times table from 1 to 10 displays in the list box, not 1 to 9

Arrays and Loops in C#

Arrays come into their own with loops. The idea is that you can loop round each position in your array and access the values. We'll try a programming example, this time.
So start your C# software up, if you haven't already, and create a new windows application. Add a button and a list box to your form. Double click your button to get at the code. For the first line, add code to clear the list box:
private void button1_Click(object sender, EventArgs e)
{
listBox1.Items.Clear();
}
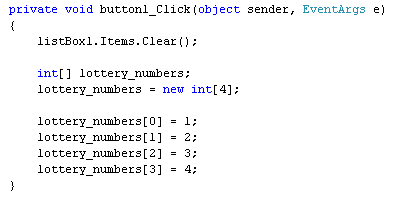
For the second and third lines, set up an integer array:
Code to set up an Array in C# .NET
Now add some values to each position in the array:
Assign values to each array position
If you wanted to, you could display each number in the list box like this:
listBox1.Items.Add( lottery_numbers[0] );
listBox1.Items.Add( lottery_numbers[1] );
listBox1.Items.Add( lottery_numbers[2] );
listBox1.Items.Add( lottery_numbers[3] );
So to get at the value in an array, you just use the array name and a position number, known as the index number:
lottery_numbers[0];
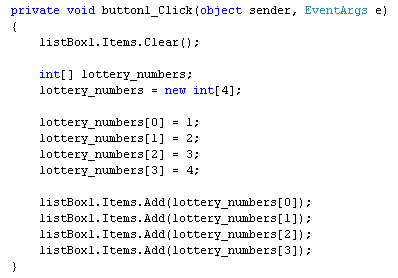
This is enough to display what value is at this position in the array. Try it out. Add the list box code to your programme:
Add the ListBox code
Run your programme and click your button. Your form should look like this:
C# .NET Form showing array values in a ListBox
So the numbers 1 to 4, the values we placed in the array, are now displayed in the list box. Halt your programme and return to the coding window.
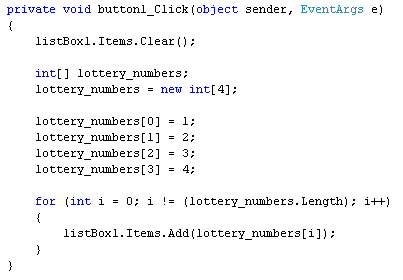
If you had a long list of numbers to display, you don't really want to type them all out by hand! Instead, you can use a loop. Add the following loop to your code:
for (int i = 0; i != (lottery_numbers.Length); i++)
{

listBox1.Items.Add( lottery_numbers[i] );
}
Now delete all of your listbox lines. Your code should then look like this:
A Loop and an Array
When you run the programme, the numbers should display in the list box again. But how does it work?
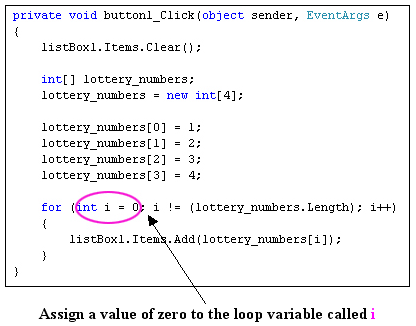
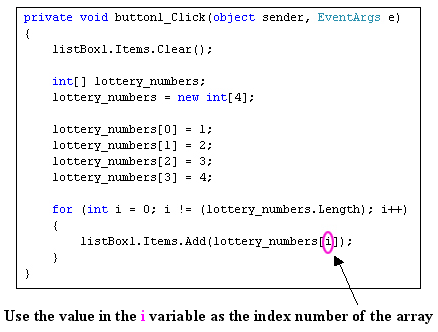
The code works because the array index number is matching the loop variable number. Here's some images to show what's happening:
Step 1
Step 2
In the first image, we've highlighted the int variable we'll called i. This gets set to zero, which is the start of the loop. In the second image, we see the i variable again. This time, it is between the square brackets of the array name. The first time round the loop, the value in i is 0. The i variable gets 1 added to it each time round the loop. So the second time round, it's value will be 1, the third time 2, etc. So this is happening:
The value in each position is then accessed, which for us was the numbers 1 to 4.
One thing to make note of is this part of the for loop:
i != (lottery_numbers.Length)
Length is a property of arrays that you can use. It refers to the number of items in your array. So we're saying, "Keep looping while the value in i does not equal The Length of the array".

Use a loop to assign values to an array

You can also use a loop to assign values to your arrays. In the code below, we're using a loop to assign values to our lottery_numbers array:
for (int i = 0; i != (lottery_numbers.Length); i++)
{
lottery_numbers[i] = i + 1;
listBox1.Items.Add(lottery_numbers[i]);
}

The only thing that has changed with our for loop is the addition of this line:
lottery_numbers[i] = i + 1;
The first time round the loop, the value in i will be zero. Which gives us this:
lottery_numbers[0] = 0 + 1;
The second time round the loop, the value in i will be 1. Which gives us this:
lottery_numbers[1] = 1 + 1;
But what we are doing is manipulating the index number (the one in square brackets). By using the value of a loop variable, it gives you a powerful way to assign values to arrays. Previously, we did this to assign 4 numbers to our array:
lottery_numbers[0] = 1;
lottery_numbers[1] = 2;
lottery_numbers[2] = 3;
lottery_numbers[3] = 4;
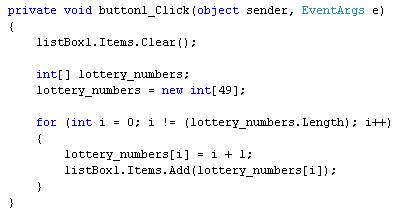
But if we need 49 numbers, that would be a lot of typing. Contrast that to the following code:
Array used in a C# Loop
Here, we've set up the array for 49 numbers. We've used a loop to assign the values 1 to 49 to each position in our array. So with one small change, we've saved ourselves an awful lot of typing!
Change your own code to match ours and try it out. When you click the button on your form, all 49 numbers should appear in the list box:
As an exercise, halt your programme and change the index number of the array from 49 to 1000. Run your programme and test it out. What you've done is to set up an array and fill it with a thousand values!

Thursday, 13 October 2011

Arrays in C#.Net

The variables you have been working with so far have only been able to hold one value at a time. Your integer variables can only hold one number, and your strings one chunk of text. An array is a way to hold more than one variable at a time. Think of a lottery programme. If you're just using single variables, you'd have to set up your lottery numbers like this:
lottery_number_1 = 1;
lottery_number_2 = 2;
lottery_number_3 = 3;
lottery_number_4 = 4;
etc
Instead of doing that, an array allows you to use just one identifying name that refers to lots of numbers.

How to set up an Array

You set up an array like this:
int[ ] lottery_numbers;
So you start with the type of array you need. In the line above, we're telling C# that the array will hold numbers (int). After the array type, you need a pair of square brackets. There should be no space between the array type and the first bracket. After the square brackets then type a space, followed by the name you want to use for your array, lotter_numbers in our case.
If your array needs to hold floating point numbers, you'd set your array up like this:
float[ ] my_float_values;
An array that needs to hold text would be set up like this:
string[ ] my_strings
So it's pretty much just like setting up a normal variable, except you type a pair of square brackets after int, or float, or string.
The next thing you need to do is to tell C# how big your array will be. The size of an array is how many items it is going to hold. You do it like this:
lottery_numbers = new int[49];
So the name of your array goes before an equals sign ( = ). After the equals sign, you type the word new. This tells C# that it is a new object. After a space, you need the array type again (int for us). Next comes some square brackets. This time, however, you type the size of the array between the brackets. In the code above, we're saying that the array will hold 49 numbers.
So the two lines would be:
int[ ] lottery_numbers;
lottery_numbers = new int[49];
If you prefer, you can put all that on one line:
int[ ] lottery_numbers = new int[49];
But you're doing two things at once, here: before the equals sign, you're telling C# that you want to set up an array; after the equals sign, you're creating a new array object of a particular size.

Assigning values to your arrays

So far, you have just set up the array, and created an array object. But the array doesn't yet hold any values. (Well it does, because C# assigns some default values for you. In the case of int arrays, this will be just zeros. But they're not your values!)
To assign a value to an array, you use the square brackets again. Here's the syntax:
array_name[ position_in_array ] = array_value;
So you start with the name of your array, followed by a pair of square brackets. In between the square brackets, you need a position in your array. You then type an equals sign, and the value that is going in that position. Here's an example using our lottery numbers:
lottery_numbers[0] = 1;
lottery_numbers[1] = 2;
lottery_numbers[2] = 3;
lottery_numbers[3] = 4;
First of all, note that the first position in a C# array is zero, and not 1. This is slightly confusing, and can trip you up! But we're telling C# to assign a value of 1 to the first position in the array, a value of 2 in the second position, a value of three in the third, and so on. Just bear in mind that array positions start at 0.
Another way to assign values in array is by using curly brackets. If you only have a few values going in to the array, you could set it up like this:
int[] lottery_numbers = new int[4] { 1, 2, 3, 4 };
So we've set up the array the same way as before - all on one line. This time, we have a pair of curly brackets at the end. In between the curly brackets, type the values for your array, and separate each value with a comma.

Getting Values Back From Methods

The Method we set up used the keyword void. We used void because we didn't want anything back from the Method. But quite often you will want something back from your Methods.
What we'll do now is to use the Subtract button and deduct one text box number from the other. We'll set up another Method called Subtract. This time, we'll set it up so as to return an answer.
If you want to return a value from your Methods, you can't use the keyword void. Simply because void means "Don't return an answer". Instead of using void, we'll use the keyword int.
Add the following Method to your code, either above or below the AddUp Method:
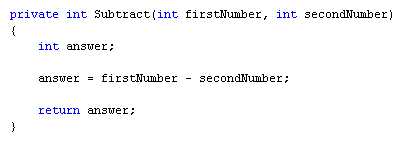
A Method that returns a value
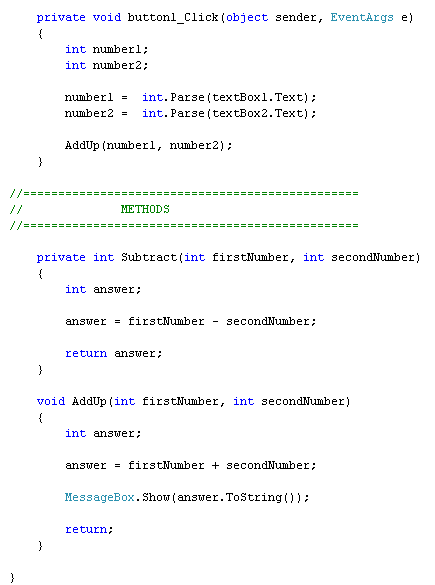
If you add a few comments, your coding window should look like ours:
What your coding window should look like
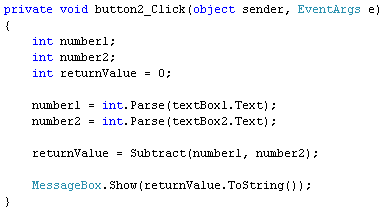
So we have one button and two Methods. Before we explain the new Method, double click the Subtract button on your form to get at its code. Then add the following:
Add this code
We'll explain how this button code works in a moment. But run your programme and you should see a message box appear when you click your Subtract button. Hopefully it will have the right answer!
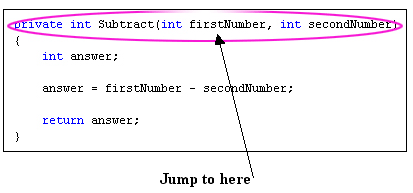
Now have a look at the first line of the new Method:
private int Subtract( int firstNumber, int secondNumber )
The part in round brackets is exactly the same as before, and works the same way - set up the Method to accept two integer values. What's new is this part:
private int Subtract
Subtract is just the name of the Method, something we came up with ourselves. Before the Method name, however, we have two new keywords - private and int.
What we want our Method to do is to bring back the answer to our subtraction. The answer will obviously be a number. And that's why int comes before the Method name: we want the answer to the Subtract Method to be an integer. If you want to return values from your Methods they need what's called a return type. This is a variable like int, float, string, bool, etc. What you're telling C# to do is to return an int (or a bool, or a float).
Have a look at the whole Method again:

A Method that returns a value
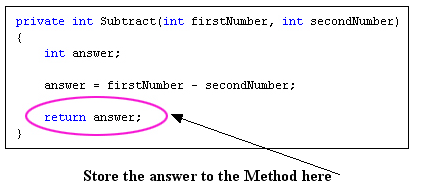
Notice the final line:
return answer;
This means, "return whatever is inside of the variable called answer."
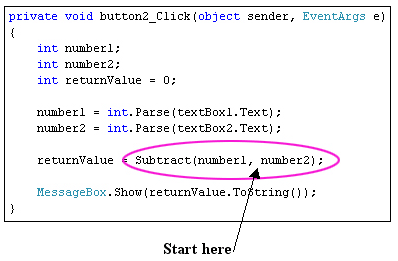
But where is C# returning to? Here's the code for the Subtract button again. The important line is in red bold below:
private void button2_Click(object sender, EventArgs e)
{
int number1;
int number2;
int returnValue = 0;
number1 = int.Parse(textBox1.Text);
number2 = int.Parse(textBox2.Text);
returnValue = Subtract(number1, number2);
MessageBox.Show(returnValue.ToString());
}
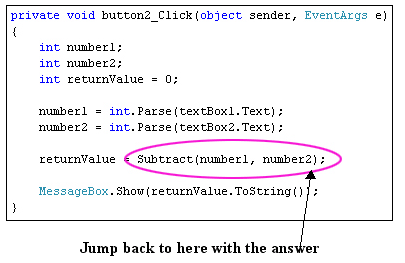
When you click the button on the form, C# moves down line by line. When it gets to this line:
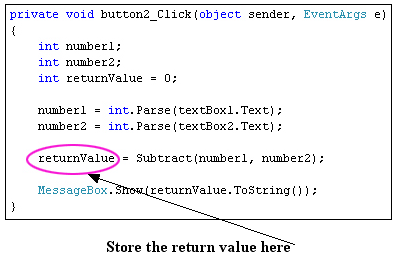
returnValue = Subtract( number1, number2 );
it will trot off and locate the Method called Subtract. It will then try to work out the code for the Method. Once it has an answer, it comes back to the same place. We have the call to the Method after an equals sign. Before the equals sign we have a new integer variable, which we've called returnValue. C# will store the answer to the Subtract Method inside of this returnValue variable. In other words, it's just like a normal variable assignment: work out the answer on the right of the equals sign, and store it on the left. In case that's not clear, these diagrams may help:
Step 1
Step 2
Step 3
Step 4
Step 5
After those steps, C# then drops down to the next line, which for us is a message box.
It can be tricky trying to follow what the method is doing, and what gets passed back. But just remember these points:

  • To set up a Method that returns a value, use a return type like int, float, bool, string, etc
  • Use the keyword return, followed by the answer you want to have passed back
  • Store the answer to your Method in another variable, which should come before an equals sign
One thing we haven't explained is why we started our Method with the word private.
Private refers to which other code has access to the Method. By using the private keyword you're telling C# that the Method can't be seen outside of this particular class. The class in question is the one at the top of the code, for the form. This one:
public partial class Form1 : Form
An alternative to private is public, which means it can be seen outside of a particular class or method. (There's also a keyword called static, which we'll cover later in the course.)
We'll leave Methods for now. But we'll be using them a lot for the rest of this book! To help your understanding of the topic, try this exercise.

Exercise
Add two more Methods to your code, one to Multiply, and one to Divide. Add code to your Multiply and Divide buttons that uses your new Methods. When you run your programme, all four buttons should work.